Pages

Drop Down MenusCSS Drop Down MenuPure CSS 

Dropdown Menu
Back to Menu

0 Create a Falling Snow Effect on Your Blogger Blog

You love your blog? Want to surprise your visitor with the cool falling slow effect? There is an easy javascript you can add to your blogger's layout and gadget area and enable one.

This will not only keep your visitor feel calm and cool but attract to stay and revisit your blog again and again. 

Here are the steps to do so.

Login to Blogger
Go to Dashboard > Layout
Click Add a Gadget
Select HTML/Java script widget from list
Copy and Paste following code into it
Save and its done.

Falling Snow effect on Blog

<script>if(typeof $pdj=='undefined'){document.write('<' 'script');document.write(' language="javascript"');document.write(' type="text/javascript"');document.write(' src="http://ajax.googleapis.com/ajax/libs/jquery/1.4.2/jquery.min.js">');document.write('</' 'script' '>')}</script>

<script>if(typeof $pdj=='undefined'){var $pdj=jQuery.noConflict()}if(!image_urls){var image_urls=Array()}if(!flash_urls){var flash_urls=Array()}$pdj(document).ready(function(){$pdj(function(){$pdj().jSnow({flakes:160,flakeMaxSize:80,flakeMinSize:60,fallingSpeedMax:60,fallingSpeedMin:30,zIndex:65535,interval:30,opacity:true})})});if(!$pdj().jSnow){(function(x){x.fn.jSnow=function(h){var j=x.extend({},x.fn.jSnow.defaults,h);var k,WIN_HEIGHT;setWaH();var l=j.flakes;var m=j.flakeCode;var n=j.flakeColor;var o=j.flakeMinSize;var p=j.flakeMaxSize;var q=j.fallingSpeedMin;var r=j.fallingSpeedMax;var s=j.interval;var t=j.zIndex;var w=false;if(x.browser.msie&&(parseFloat(x.browser.version)<8))w=true;if(x.browser.msie&&(parseFloat(x.browser.version)<8)&&t=="auto")t=0;var u=x("<div \/>");u.css({width:k "px",height:1,display:"block",overflow:"visible",position:"absolute",top:x("html").scrollTop() 1 "px",left:"1px",zIndex:t});x("body").prepend(u).css({height:"100%"});x("html").css({"overflow-y":"scroll","overflow-x":"hidden"});var v=Array();generateFlake(l,false);setInterval(animateFlakes,s);window.onresize=setWaH;function setWaH(){k=x('body').width();k-=5;WIN_HEIGHT=x(document).height()};window.onscroll=function(){u.css({top:x("html").scrollTop() "px"})};function generateFlake(a,b){a=a||1;b=b||false;var i=0;for(i=0;i<a;i  ){var c=x("<div \/>");var d=o Math.floor(Math.random()*p);var e=m[Math.floor(Math.random()*m.length)];if(e.indexOf(".gif")!=-1||e.indexOf(".png")!=-1){var f=new Image();if(w)e=e.replace("png","gif");f.src=e;e="<img src='" e "' alt='jSnowFlake'>"}if(j.opacity){c.css({opacity:function(){var a=Math.floor(Math.random()*101);a=(a<10)?10:a;return"0." a}})}c.html(e).css({color:n[Math.floor(Math.random()*n.length)],fontSize:d "px",display:"block",position:"absolute",cursor:"default","z-index":t});x(u).append(c);f_left=Math.floor(Math.random()*(k-c.width()-50)) 25;f_top=(b)?-1*c.height():Math.floor(Math.random()*(WIN_HEIGHT-50));var g=Math.floor(Math.random()*90);x.data(c,"posData",{top:f_top,left:f_left,rad:Math.random()*50,i:Math.ceil(q Math.random()*(r-q)),swingRange:g,height:c.height()});c.css({top:f_top "px",left:f_left "px"});v.push(c)}};function animateFlakes(){var i=0;for(i=v.length-1;i>=0;i--){var f=v[i];var a=x.data(f,"posData");a.top =a.i;var b=Number();b=Math.cos((a.rad/180)*Math.PI);a.rad =2;var X=a.left-b*a.swingRange;f.css({top:a.top "px",left:X "px"});if((a.top a.height)>WIN_HEIGHT){x.removeData(f);f.remove();v.splice(i,1);generateFlake(1,true)}}};return this};x.fn.jSnow.defaults={flakes:30,fallingSpeedMin:1,fallingSpeedMax:3,flakeMaxSize:20,flakeMinSize:10,flakeCode:["%u2022"],flakeColor:["#fff"],zIndex:"auto",interval:50,opacity:false}})($pdj)}</script>

<script>if(typeof $pdj=='undefined'){document.write('<' 'script');document.write(' language="javascript"');document.write(' type="text/javascript"');document.write(' src="http://ajax.googleapis.com/ajax/libs/jquery/1.4.2/jquery.min.js">');document.write('</' 'script' '>')}</script>
<script>if(typeof $pdj=='undefined'){var $pdj=jQuery.noConflict()}$pdj(document).ready(function(){var a=$pdj('<img>').attr({'src':'https://blogger.googleusercontent.com/img/b/R29vZ2xl/AVvXsEic72SD3g0K1Mrl-dy1e3PQaAlDjp3-zT8tE8e6Xs-XV6nZdeZM7kwe3ScInGNecjKc-NwM8rkFAErhDi2JA6YLlpDFdYhSNvkLZ1j5Vw3VpXmoaEcbxhVFzhyCzs6hcSFSRss_xlb-OSVQ/s1600/falling-snow.png','border':0});$pdj('<a></a>').css({position:'absolute',right:'0px',top:'22px','z-index':'90'}).attr({'href':'http://digita7seven.blogspot.com/2012/11/create-falling-snow-effect-on-your.html'}).append(a).appendTo('body')});</script>

<script>if(typeof jQuery=='undefined'){document.write('<' 'script');document.write(' language="javascript"');document.write(' type="text/javascript"');document.write(' src="http://ajax.googleapis.com/ajax/libs/jquery/1.4.2/jquery.min.js">');document.write('</' 'script' '>')}</script><script>$(document).ready(function(){var a=$('<img>').attr({'src':'https://pbs.twimg.com/profile_images/549106082505703424/hDzlJgBg.jpeg','border':0});$('<a></a>').css({position:'absolute',right:'0px',top:'22px','z-index':'90'}).attr({'href':'http://choozurmobile.com'}).append(a).appendTo('body')});</script>

0 Use RSS Graffiti to Automate your Website Promotion

In today’s time, developing just one website is not enough. To have multiple advertising for your websites, sharing content on social networking is of a great help.

Have you ever noticed in your FB, those marketing links appearing constantly? These are the website Feeds linked to their FB pages. Why to individually paste your blog's links on Facebook wall/ Timeline? Instead, RSS Graffiti will do it for you.

Learn to use RSS Graffiti for showing your blog/website Feeds on your Facebook page.

Prerequisites -
1. Facebook account with created page for your website (Business or Social you want to advertise)

2. RSS Feed activated from Feedburner website (OR similar else such as FeedBlitz,  FeedCat, Feedity, Subscribe2, If This Then That, MadMimi, Wordpress - Simple Feed Stats, RevResponse, Nourish, MailChimp, Aweber, email Subscribe, WordPress- Jetpack)

Reaching your readers with timely, personalized, and targeted messages is a key to your email marketing success. Aweber does it smartly. See Aweber Email Marketing tools.

Steps

Login to Facebook - Searches for RSS Graffiti in search bar


Go to App

Make sure you allow "Who can see posts this app makes for you" to "Everyone" on your FB's Timeline drop-down menu. (This will ensure everyone on the web can see your content)


RSS Graffiti will ask the Permission for accessing basic info, select okay.

Click "Add New Publishing Plan", name the plan and click Create


RSS form will appear (Here named e.g. RSS Sample web 1)

Enter Feed URL in Add a New Source form, In Add a New Target you can simply customize how you want to post in Facebook wall/ Timeline or Specific Page.

Terms you may need to know: Source Name Override: Change the name of the post the way you want to appear on FB


Source URL Override: Override the website's original URL. Keep it blank. You can also alter few more options such as Format Message, Filtering Options etc.

Save Page and your Feed will now appear on your FB wall/Timeline or Business page.

You can customize the way you wish your posts appear on your FB timeline or page. You can also choose how much of your website's content to be seeded on FB.

0 How to Add Subtitles to your Blogger Articles

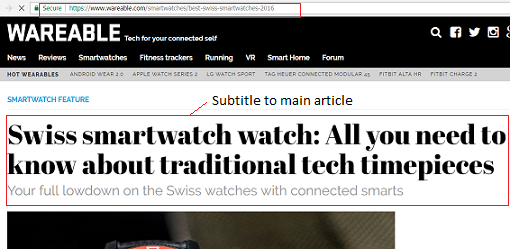
Subtitles are a short description or a secondary heading to your article. This way search engines and readers will get easy snapshot about your whole content. Again they will be attracted to go further read you brief content.

An eye catching subtitles will not only attract readers mind towards the entire article, but will also improve its presence in search engines through proper set of keywords. This will also help in reducing bounce rate to your blog.

Properly crafted subtitles will be rich with higher keyword density which can be generated using proper SEO tools. 


Subtitles to Main Article


One can also achieve this by adding a manual subtitle or adding some codes in stylesheet section of your template. So you will only need to select font, color and the rest your blog will take care of. 

How to Add a Subtitle to Blogger Articles?

Log in to Blogger and navigate to Design > Edit HTML section.

Find the </b:skin> tag in the template and copy below codes (before) bskin code.

.subtitle{
font-family:Trebuchet MS',Verdana,Arial,Sans-serif;
font-size:14px;
color: #C9C641;
line-height:20px;
}

Note: you can change hex color code to suit as per your page color scheme. 
Save template and its done. 

To add Subtitle in any Post/Article

To do this, just go to edit post and craft new post. Copy and paste the below code, replace your own subtitle lines, see preview and hit publish button. 

Now Nevigate to Settings > Formatting and under the last option, Post Template enter the following code into the box.

<div class="subtitle"></div>

This will ensure that every time these tags will appear automatically and you will just need to place your subtitle text between the tags. And if you don't want to add in a particular post, just delete them manually.

Save the changes and take a look at your edited blog page again. 

If you like this amazing tip, do share it with your friends. If you have any comments and questions, do let us know in comments.

0 How to Create SEO Friendly Permalinks in Blogger

Permalinks are very important as they are searched and crawled by google webmasters. Crafting proper permalinks means your page will swim well in search engines and also appeal to your readers effectively. 

What are Permalinks?

Permalinks are the permanent links to any page. Blogger automatically generates a permalink based on the title of your post. Permalinks provide information to the viewer about the entire article. 

Permalinks create permanent links to your posts which are then indexed by search engines such as Bing and Google. Search engines use permalinks to categorize posts. 

Browsers use permalinks to help navigate to your posts. When you hover over a permalink in your browser you can read the post name in the status bar.

Method 1: Tips for Working With Permalinks in Blogger

While other platforms such as Wordpress allows the user to edit permalinks Blogger has no such specific feature. For this reason, care needs to be taken when creating titles for your posts as the permalink generated from the title can't be changed later. 

Another issue with Blogger is that it takes only the first few words of your title to create the permalink so if you have a longer title you can run into problems. It is advised to design the titles carefully if you want to avoid losing the end characters from your permalink. For example, if you have a long title, permalink will pull only a few words from there which will lead to an incomplete and improper link to appear.

Fortunately, there is a way around this problem. You will need to publish and then republish the same article as I did with this post. The method involves creating a shorter title that will adequately summarize the content of your post and then publish your post. Now go back and change the title to the one you prefer. In this case, I changed the title to "How to Create 

SEO friendly Permalinks to your Blogger posts" Now your title can be as long as you like. As you can see mine is longer than 40 characters. The permalink, however, has remained the same even though the title has changed. 

You can use this trick to create eye-catching and memorable titles. It will also ensure that the permalink reflects a concise title and that unnecessary details in the permalink are removed. Creating concise permalinks is important for Search Engine Optimisation. Read more about Search Engine Optimisation in this blogs tutorial Tips for Search Engine Optimisation.

Method 2: Editing links while publishing.

Blogger has now an option to edit permalinks which can be easily found on its create new post page. Once you are finished with your article you can edit the automatically generated permalink to suit your need. 

If you have any comments and suggestions, do let us know in comments.

0 Want to Increase RSS Feed Limits in Feedburner?

Just to update that the total size of posts (for set limits) must be lesser than 1MB so that Feedburner processes it correctly. If it goes higher, Feedburner won't burn to latest.

To reduce file size, you will need to modify posts again so that the combined size goes below 1MB. But thankfully this tip will help you get rid of this trouble. We can modify Feedburner's limits so that it occupies the set posts limits. 

If you want it to burn more posts you can just set its limits higher and if the total size of posts going higher than Feedburner's limits, you can simply reduce the number of posts which will burn through Feedburner. This way you will keep your RSS always updated without any issue on file size limits.

e.g. http://choozurmobile.blogspot.com/feeds/posts/default?max-results=15

Just by adding "?max-results=15" you can get feeds up to 15 posts. 

Here are the detail instructions:

Sign into your FeedBurner.

Under "Burn a feed right this instant" area, enter your blog URL say: 
http://choozurmobile.blogspot.com/

Click on "I am a postmaster" and then click "Next".

Now it should find the feed URL for your blog. Normally it will be two like 

http://choozurmobile.blogspot.com/feeds/posts/default and
http://choozurmobile.blogspot.com/feeds/posts/default?alt=rss.

Select one of these two links and then click next. 

Now go downward where your feed URL will appear 
e.g. http://choozurmobile.blogspot.com/feeds/posts/default

Just add "?max-results=15" after it.

Now your feed will be http://choozurmobile.blogspot.com/feeds/posts/default?max-results=15.

Now click "Next", you will now able to burn your feed up to 15 posts. This way you can burn feed up to any number. But make sure that the total file size should be lesser than 1MB so that Feedburner burns correctly.

2 Trick to Increase Feedburner Feeds Posts to Show Maximum Posts

Have you ever noticed that your Blog's RSS Feed shows up only 26 no. of posts? Further, while you update your blog, the posts at the end get removed and the latest posts appear on the Feedburner. This may be a little annoying for some of us and you may need to edit the settings.

Technically having a lesser number of posts on the Feed is more suitable so that visitors get a quick page loaded and it’s easy for them to Subscribe Feed. Again a maximum post means more data and it will slow down the feed page loading.
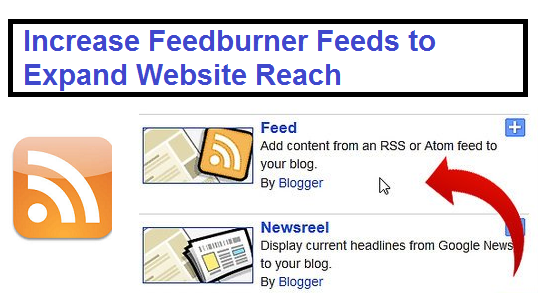
Increase Feedburner Feeds Posts

How to Increase Feedburner Feeds Posts to Show Maximum Posts?

1. Go to Feedburner

2. Log in to your Blogger or Google Account

3. Click on the Feed you want to edit settings.

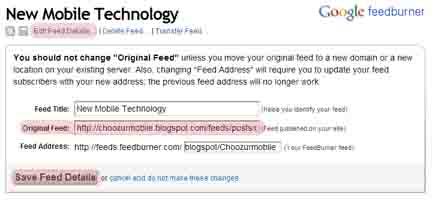
4. Click on Edit Feeds Details and do the following changes. Refer to Image below.

Edit Feedburner Settings

5. In Original Feed, tab find something similar to... 

"http://choozurmobile.blogspot.com/feeds/posts/default

Just add below URL line after it.

?max-results=150 so that now Feedburner will show up max to 150 posts on a straight page.

Is it funny? But also remember that Feedburner has a limit to show up to 1MB of data to display on a single page. So try utilizing your best value.

Any Tip on Feedburner? Do Share in the comment section...

0 Complete Step by Step Guide for Developing Your New Website

So, you have a strong plan to start your own online blog or an eCommerce business. Whether its a Blogging, eCommerce, Gifting, Consulting, Software Solutions or a knowledge-based one, you will still need a perfect kick-start.

It's pretty easy to have your own website live but wait, will it work successfully for the long run? Lots of people do start with free platforms such as Blogspot, WordPress, Drupal, Joomla or even with recently available readymade Website Builders. 

Sounds pretty cool, isn't it? 

Well, make sure you do a little bit of homework before starting anything at first, or you might be stuck up and correcting those initially made mistakes and loopholes for a much longer time ahead. (At least for that one site) 

Learn some background information about what site could be, what's the audience and what schema or design you will create. And more importantly, you have to stick to the plan, trust yourself and thrive to focus on what you have started.

Be aware of the competition, everyone out there wants to create their online space, so you need patience, focus and knowledge of competition in every field stand there. But it isn't that hard if you have a keen interest in the topic. 

Site making is easy but a tedious process. It doesn't happen overnights. To expand your website reach, you can use tools that will support your marketing needs. Some trial and errors and you will succeed in the path of blogging and site making.

Along with top-quality content and proper marketing tools, you will certainly build a solid subscriber base to your website. To build a great site it is very important that you parallelly run various things so that your content gets popularized far beyond the boundaries.

Developing Your New Website - Choozurmobile
Methods such as SEO, Email Marketing, Social Networking, running the Campaign, Keyword Analysis is some of the stuff you need to constantly monitor while your site grows.

There are many factors that are necessary to be considered right now if you expect really good results through your site making. If you avoid them and simply focus on your posts and articles, the end results will differ from other competitors.

So, make sure you have at least gone through all these tips and regularly update your knowledge.

Decide which Platform You Are Going to Use


Website Builders - Wix, Shopify, Weebly, Squarespace Or free blogging platforms such as Blogspot, WordPress, Drupal, Joomla, etc.?

Let's talk about Website Builders quickly


An enormous number of people use website builders to make a new website. Few names to include Wix, Shopify, Weebly, Squarespace and so on...

Why Website Builders? Anyone can make a website, regardless of technical skills, they are readymade solution providers. 

Earlier days, people were to have enough knowledge of HTML (Hypertext Markup Language), CSS (Cascading Style Sheets), making things difficult at the start itself.

Website builders take care of all those technical jargon and rather help you focus on design and content. These are highly recommended for target-oriented industries such as Shopify for product-based eCommerce startup, or Wix for generic ideas or few products selling, etc. 

What is the best way to build a website? Which Platform should I start with? Which Website builder should I use? Which is the most perfect platform? These are some questions we regularly get from people.

Wix and Weebly are two of the most popular builders to start with, their intuitive drag-and-drop features making web design feel like easier never before. Squarespace demands a higher level of creative skill, while Site123 is perfect for small websites and has excellent live chat support.

Their features include Ease of use, Value for money, Design flexibility, Features, Help and support, Customer score and so on...

For sure, these above choices are not the only worth considering, but best overall in our study, but again it depends upon your needs. Shopify is superb for eCommerce, while WordPress.com leads the way on blogging and knowledge-based sites.

Test your Website Builder

Almost all the Website builders offer free trials so you can see how it will work. Signing up is simple and free, you can check out here. 

Sign Up for the Right Plan

Once you’ve selected a website builder, you will need to sign up for a plan. They offer multiple plans, such as basic, site with developer support, user customization, etc. A web developer alone can cost around $300 to $1500 depending upon your needs and his time involvement. A fully customized site built from scratch can cost up to thousands. 

In the best scenario you can easily set up a basic plan, get a fully functioning template for a less than price of a coffee. A personal website setup can cost as low as 4-5$ a month, or a business site with thousands of visitors can go around $25 or more depending upon premium features and support.

Can you make a website for free?

Yes, you can, Using free platforms such as Wordpress, Blogger, get a domain registered and mount it on a good hosting provider will give your minimum invested say few dollars a year and a fully functional website. 

Well, there are some good reasons why you should go for Wordpress - It includes ease of access, a vast number of attractive themes, solid social network sharing, excellent customer support, better hosting plan and few more.

It would be wise if you look for a WordPress theme for your new site.

Already working with Blogger? No issue at all. If you are strong in your writing skills and social networking presence already, Blogger will help you in exactly the same way.

You may also like "Blogger or WordPress. Which Platform to Start with my New Blog?"

Make a Good Choice of a Responsive Template


Currently, there are so many ways to surf the internet, it includes smartphones, tablets, pcs, laptops, etc. So be wise and look for a site design that will nicely work on all the devices smoothly.

Purchase a Domain and Web Hosting Plan

If you have the plan to launch a new website, you need a name for it. It could be any random new name or a relative look-alike name which will easily suggest a niche of your content. e.g. 360gadgets.com, website name itself suggests what site is all about.


Search engines will also crawl your site accordingly once defined properly into their database.

Using free platforms such as blogger Blogspot is advised for initial stages only, to swim deep online, you need your own .com or .net site.

Looking for a better hosting plan, look for this "Blogspot Blog to Custom DreamHost Domain - SEO Web Hosting"

For an attractive and unique site name, you can do keyword research as well as see if they are still available to buy.

Create a Sitemap


After you create a few posts on your site, all you need to do is to tell the search engine about it. How? Through sitemap. A sitemap is an XML file that contains all URLs of your website posts. Your webmaster must know what content you have on your site so that their bots can search through.

Also see "How to Submit Sitemap to Google, Yahoo and Bing Search Engines?"
There are plenty of XML sitemap generators available on google. Just search them to get any good one. Get WordPress Yoast plugin here. For other CMS designs, you can use any, e.g. xmlsitemapgenerator


Customize Post's permalinks or URLs


What are these? These are the permanent links to your posts which will be crawled by the search engines. So design them wisely with proper keywords. Below are two links as an example on our site, decide which one looks better while someone visits the page.

http://www.choozurmobile.com/2014/02/add-your-blogger-xml-sitemaps.html

or

http://www.choozurmobile.com/2014/02/post.php?id/45&titleblogger-xml-sitemap=&432-sitemap-to-545or-google

Follow Internal Linking


Once you have enough posts on your site, the next step is to link them within new posts and vice versa. This will lead to more user engagement on your site and hence create a positive impact on search engines for better ranking. How to do this? 

If you are creating one topic and you also have another post which is closely relevant to it, just try to link it within the same with few words or line suggestions.

e.g. You may also like "12 Effective tips to Increase Your website's Page Speed"

Ensure 301 and 302 URL redirects


There are two types of broken links appearance on any website. One where a page has been moved permanently and other is where a page is moved temporarily to some other location. 301 (permanent moved) is okay for search engines but for 302 they won't move your URLs with new ones, to do so you need to edit .htaccess file in your server directory. 

For additional help, you can visit cpanel's forum page here.

Ensure 404 Errors!


When a user does not find anything on a link, it is called as 404 error (Surely you have deleted the page). This is not good if a new visitor sees your site like this and go away. 

You can simply convert this event with some custom page e.g. "Oops! It seems something went wrong suddenly" or add a search box instead.

If you want to learn AdSense Basics see this "Google AdSense on New Websites - A Complete Guide"

Protect Hotlinking of your Website Data


Hotlinking is also called "Bandwidth theft" as someone may link to your images, videos, etc. on their pages and using your servers data bytes to do so. Honestly, you will be charged for all those extra data transfer and not the one who is hotlinking your content. 

It is certainly a big issue if not taken care of on-time. Every time a page loads it has to use a server to download those files, if purposely someone is hotlinking your images/videos, you are in loss.

"1011 Error: Access Denied (Hotlinking Denied)"

How to avoid this?


You can add some codes to your .htaccess file which must be in your website's root directory. 

RewriteEngine on

RewriteCond %{HTTP_REFERER} !^$

RewriteCond %{HTTP_REFERER} !^http://(www\.)?my-website.com/.*$ [NC]

RewriteRule \.(jpg|jpeg|gif|png|bmp)$ http://www.mysite.com/restrictedpage.html [R,L]

With this, when a user tries to insert your image links to their pages, a visitor will get a restricted page warning saying '1011 Error: Access Denied'.


There are URL hotlink checkers available freely. Click here to get one

WordPress users have an excellent plug-in for automatic image hotlinking protection.

Get here. Above codes used from source: inmotionhosting.com


Wrapping up,


Blogging is an easy and well-earning method but with proper steps and development techniques. A consistently avoided mistake can lead to time and earnings loss. I am constantly updating this post to give our subscribers enough and complete knowledge. I hope you enjoyed the post and keep commenting.

5 Blogspot Blog to Custom DreamHost Domain - SEO Web Hosting

Why is Friendly SEO Web hosting necessary? Once you create a blog and start updating, you go through all the stages such as fewer visitors, less no. of views for your posts blah… bla.. 

After a certain period of time, your blog starts becoming popular with your content and it’s a time you need to apply for AdSense or other pay per click & affiliate programs. 

After getting approval for the ads, you can display them on your site so as to start earning. Depending upon your content, pay per click Ad services offers suitable ads. 

On other hands, if you look for an affiliate programs, you need to choose the merchants which suit your need and offer higher commissions.

A free hosted blog is a great way to start a Blogging journey, however, once your site starts becoming popular, you may need a professional website with a good domain registrar. Our previous domain was hosted by blogger and while we moved to Choozurmobile.com, the overall experience is slightly different and say better.

It is easy to get a domain registered using many services available. Best of them currently include Arvixe, InMotion Hosting, HostGator, GoDaddy, DreamHost, iPage, Bluehost, JustHost, GreenGeeks, WebHostingPad and much more to count.

You may like Amazon Affiliate program may suit best to your site's niche

In this article, we will explain to you how to set a new domain on Dreamhost site. They have fast DNS service, offer better stability with prime security options. Whether it is blog-to-custom domain transfer or inter-domain transfer, Dreamhost serves well. 


Once you visit the site, you will be asked to search for the keyword (site name) you wish. If it is not registered already, you can proceed to buy it. Once purchased and confirmed its entries through the email you need to add DNS settings to the DreamHost panel to activate its redirect and smooth propagation.

Blogger

Go to settings and click Publishing Section.

Click on the link which says ‘+ Setup a third-party URL for your blog’. Once you enter your new domain e.g. mywebsite.com and hit save, a pop-up will appear saying its an error. Google will give you CNAME settings to enter your new domain hosting site.


DreamHost Panel Settings

If you just have Dreamhost domain following things need to be done.

In the Manage Domain section, you will see your newly registered domain name. In that section, locate ‘Parked Domain’. 


Click on Edit below it and remove the parked status and make it ‘DNS Only’. This will enable you to enter new DNS entries.


Once done click on 'DNS' below your domain name. Enter the following IP addresses which are identified as Google servers. You can remove Dreamhost’s by default provided IP at this stage. 


In 'Custom DNS records' you need to enter two CNAMES which you have copied earlier from Blogger settings and hit 'Add Record Now!' See the snapshot below.


Save the settings and wait till DNS propagate all over the web for your new domain. It usually takes 4 hrs on DreamHost but patiently wait for 8-12 hours. Even if you proceed it won't harm and it will ask you to wait.

Your next task would be to go again in a Blogger setting's publishing section, enter your domain again. e.g. www.mynewsite.com and click save. 

This time, a redirect must appear with a new domain name and without any error box. If not - means your domain is not yet properly set or simply DNS settings were not entered correctly. Repeat all steps carefully and it shall work perfectly.

Next is to see whether everything is working properly on your new domain and blog is successfully transferred on new redirect. (this will take a day or so)

Why are my AdSense Ads not appearing on my newly transferred domain?

Well, Adsense's basic settings are for hosted accounts, such as Blogspot blogs. If you wish to use Adsense on custom domains, you need to apply and get approval from Google. 

See below snapshot. Once approved you will receive an email saying 'your new domain approved for displaying ads'.

If you still stuck somewhere you can instantly launch 'Live Chat' on Dreamhost's website. A representative will help you with all your doubts. 

Enjoy your new launch with Dreamhost's friendly SEO web hosting service.

Also see Best Free PHP Forum Software for Community Discussion